Dining from the Dollar Store: Cheese

There's something about cheese... What's even better,  it's not difficult to make. And, most of the ingredients come from the Dollar Store.

QUESO BLANCO
(White Cheese)

Ingredients:

1 gallon of whole milk*
White vinegar
Garlic powder
Onion powder
Parsley

Equipment:

5-quart pot
Mixing spoon
Measuring cup
Slotted spoon
Colander
Large bowl
Cloth
Rubber band
Digital thermometer


Pour the milk into the pot and add the garlic powder, onion powder, and parsley to taste.


Turn the burner on high and stir the milk until the temperature reaches 195 degrees Fahrenheit. Stirring constantly is a must, for it prevents the milk from scalding.


When the temperature reaches 195 degrees Fahrenheit, slowly pour in 1/4 cup of white vinegar. The milk will begin to curdle and resemble small pebbles.


Place a colander in large mixing bowl,


Line it with a cloth like flour sack cloth (only $1.00 at the Dollar Store),


And ladle the curd into the cloth-lined colander with a slotted spoon.


Twist the cloth around the curd and close it with a rubber band, then hang the cloth-wrapped curds over the bowl to drain.


Let the curds drain for at least four hours, then unwrap.


This is a versatile cheese that can be served with bread, eaten on its own, or  crumbled over pasta. According to Barbara Skapa of Echo Ridge Cheese, Queso Blanco cheese "does not melt when diced and stir-fried".


Equipment that can be purchased at the Dollar Store:

Slotted spoon (the one pictured above was purchased at the Dollar Store over a year ago and is no longer available, though other models are)
Flour sack cloth
Colander [plastic]
Mixing spoon
Measuring cup
Rubber bands


Variations

Try adding diced onions, pressed garlic, chives, or other spices. If you have access to raw milk, substitute it for pasteurized milk. The resulting cheese will be richer and more flavorful.


A note about flour sack cloth

Wash the cloth before use. After using the cloth to make cheese, wash it thoroughly with soap and hot water before throwing it into the washer. This prevents the rest of your laundry from smelling like whey or spoiled milk.


Cultured cheese

Making cultured cheese is fun and delicious, though it does require three ingredients not found at the Dollar Store. If there is an interest, a blog devoted to Fromage Blanc can be created.


*As milk at the Dollar Store is sold in pint containers, it is more economical to buy a gallon of milk elsewhere. Buy whole milk only.


Dining from the Dollar Store: Hummus

According to Dawn Lewis at Culinary Arts 360, hummus is "one of the oldest foods known, dating back to Egypt over 7,000 years ago". It is also simple to make as well as delicious and nutritious.


HUMMUS


Ingredients:

2 15-ounce cans garbanzo beans
2 cloves garlic, minced  (or 1/2 teaspoon garlic powder)
2/3 cups roasted tahini*
1/3 cup lemon jouice
1/4 olive oil (or olive/soybean oil as found at the Dollar Store)
1/2 cup water
1/2 teaspoon salt
Paprika


Equipment:

Measuring cups
Measuring spoons
Food processor
Colander


Empty the garbanzo beans into a colander and rinse them with cold water. Put the rinsed beans into the bowl of the food processor. 


Add the garlic
Tahini
Lemon juice and oil

And salt

Put the cover on the processor and mix until smooth.

Pour into a serving bowl and sprinkle with a pinch of paprika.

Serve with bread (see previous blog) or chopped vegetables like carrots, celery, cauliflower, broccoli, mushrooms, and more.


Equipment used in the recipe that can be found at the Dollar Store:

Colander [plastic]
Measuring cups
Measuring spoons


Variations:

Making the recipe with raw garlic instead of garlic powder gives the hummus a nice zing. And, if you are a fan of garlic, you may find you will need to add more than what the recipe specifies. 

If you like olive oil, try olive oil from California. It's fresher than olive oil imported from Italy and is available at grocery stores and health food stores.

Hummus is something that lends itself to variations such as sun-dried tomatoes, pine nuts, other spices like cumin and more.

Note:

Tahini is a paste made from ground sesame seeds, and can be found at grocery stores and health food stores.


Dining from the Dollar Store: Bread

Making bread is something wonderful: not only is it delicious, but you are able to create something that is natural and filling. Not only that, the bread you make is cheaper than what you can buy in the store.

My staple recipe is borrowed from a must-have book, Artisan Bread in Five Minutes a Day. While the recipe is basic and very easy to make, it allows many variations.


BREAD

Ingredients:

3 cups warm water
1 1/2 tablespoon granulated yeast *
11/2 tablespoon salt
6 1/2 cups flour (buy two 2-pound bags of flour)
Cooking spray 


Yield:

Four one-pound loaves


Equipment:

Measuring cup/s
Measuring spoons
Container with lid or bowl
Scale
Tea towel (preferably not made of terry cloth as the dough can stick to the nap)
Baking sheet
Mixing spoon
Bread knife
Small oven-proof container or pan
Baking rack


Preparation: Making the Dough

Pour the warm water, salt and yeast into the container


Then add the flour

And stir until the ingredients are combined.

Cover the container (the cover does not need to be air-tight)


And let stand until the dough rises to the top of the container. If you are using a bowl, cover it with a tea towel.

Cover the container or bowl and place it in the refrigerator. The dough must be refrigerated for at least three hours before it can be used. The dough can keep for up to two weeks in the refrigerator.


Preparation: Baking the Bread

Grease the baking sheet with cooking spray. Place an oven-proof pan in the bottom of the oven or on a bottom shelf.

To make a one-pound loaf, measure out some dough and weigh it, then shape it into a ball with your hands and place it on the baking sheet.

Cover the loaf (or loaves) with the tea towel


And let the dough rise in a warm place for an hour or two.

Set the oven for 450 degrees Fahrenheit.

Sprinkle the loafs with flour

Then score them with a bread knife.

Place the baking sheet with the loaves in the oven then pour a 1/2 cup of water into the oven-proof container in the oven. Bake the loaves for 35 minutes. Let cool before eating.

Bon appétit!


Equipment used in the recipe that can be found at the Dollar Store:

Mixing spoon
Measuring cups
Measuring spoons
Baking or cookie sheet
Cooling racks
Bread knife
Tea or dish towls
Pot holder


Variations:

Should you prefer a more traditionally-shaped load, the bread dough can be baked in a greased bread pan.

To flavor the dough, add spices such as ground rosemary, onion powder or chopped onions, garlic or minced garlic, and more.

Consider buying the flour in larger quantities. Up to 10 pound bags can be found at the local grocery store. For those who consider making the bulk of their bread rather than buying their bread from the store, 50 pound bags are available at baking supply stores such as Downeast Food Distributors which cost a little more than the 10 pound bags of flour sold at the grocery store.


I like to use flour that isn't bleached or bromated.

Buying yeast in large quantities is also a good investment, as it can keep for a long time in your refrigerator without spoiling. Each envelope of yeast sold in the store equals one tablespoon. Jars of yeast can be found at the grocery store, while two pound bags of yeast can be found at baking supply stores or at stores like BJ's Wholesale Club. The two pound bags of yeast can be kept in a glass jar with a tightly closing lid.

* According to the man I spoke with at the local Dollar Store, some Dollar Stores carry yeast. The one near me did not.

Dining from the Dollar Store: Fritatta

In these tough economic times, eating well can seem like a challenge. To that end, I thought I would do a series of blogs on creating healthy meals and food from ingredients found at the Dollar Store. For these recipes, I would allow myself three outside ingredients as well as the full range of my personal kitchen equipment (many of which can be bought at the Dollar Store as well). I will also include possible variations, which can include outside ingredients.

The first recipe I chose was a frittata, which is a fried omelet. The beauty of the frittata is that it is possible to create so many variations. Should you have left-overs in the fridge you don't know what to do with, they can go into the frittata.


FRITTATA

Ingredients:

1 carton of eggs
1 carton of milk
1 bottle of garlic powder
1 bottle of onion powder
1 bottle of parsley
1 package of shredded cheddar cheese*
2 tablespoons butter*
2 packages of frozen vegetables (I chose cut leaf spinach and mixed vegetables)


Equipment:

Measuring cup
Whisk
Mixing spoon
Oven-proof pan 


Preparation:

Whisk the eggs (I used all eight) with 1/4 cup of milk in a bowl until smooth, then add a garlic powder, onion powder, and parsley to taste and whisk that also. If you don't have a whisk, a fork will work as well.

Open the packages of frozen vegetables. Break off small pieces of spinach and add that to the eggs, and add some of the mixed vegetables as well, then whisk them into the egg mixture. Put the rest of the vegetables in a microwave-safe container and reserve for later.


Turn the oven to broil. 

Turn the burner on the stove to medium, and melt some butter in an oven-safe frying pan.

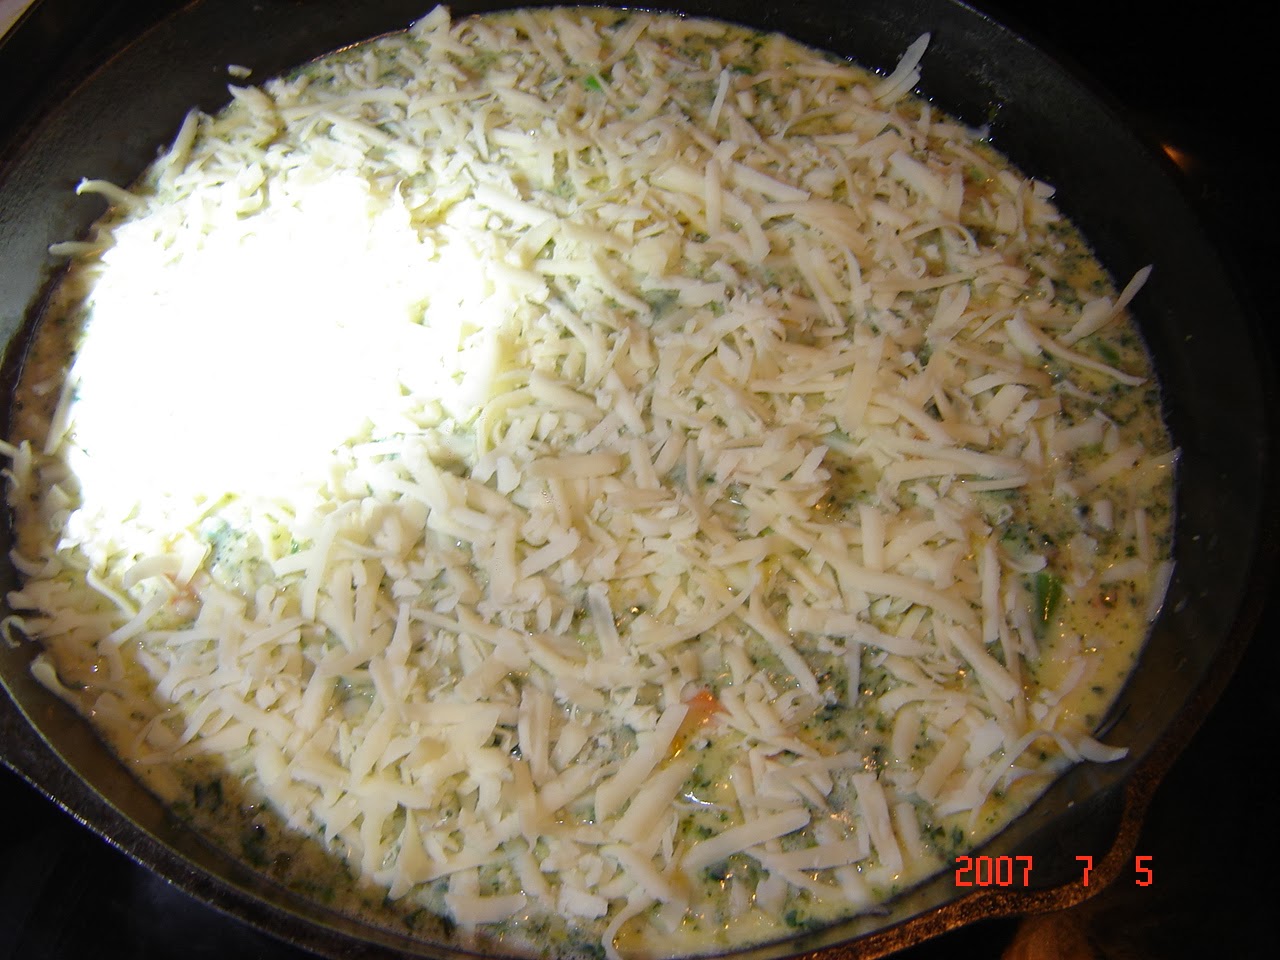
Pour in the egg mixture into the pan, and stir the eggs until they begin to solidify. You will notice that the eggs will turn a brighter yellow as they begin to cook.


 Once the eggs begin to solidify, quickly sprinkle the shredded cheese on top of the egg mixture and put the pan in the oven, setting the timer for five minutes.


While the frittata is cooking, add 1/4 cup of water to the container of frozen vegetables, and put them in the microwave for 2 minutes. When the microwave stops, remove the container of vegetables from the microwave, drain the vegetables in a colander, and return the vegetables to the container. Add garlic powder, onion powder and parsley to the vegetables, as well as some butter, and stir, then cook in the microwave for another minute. 

Remove the frittata from the oven and let rest for five minutes or less, then serve with the vegetables.


For $7.00 plus the cost of the shredded cheese and butter, this meal can serve a family of four with some leftovers for another meal. Best yet, the spices and butter can be used for other meals.


Equipment used in the recipe that can be found at the Dollar Store:


Measuring spoons
Measuring cups
Colander
Mixing spoons


Variations:

You can add fresh vegetables to the frittata as well. Chopped garlic, onions, potatoes, beans, carrots, peas, and other vegetables cooked in butter until tender, then mixed with the egg mixture can create a lovely meal no matter the season. Vegetables don't have to be the only additions to a frittata. Try adding sausage, smoked salmon, and more.

If you are interested in shopping locally for fresh food and don't have a garden or chickens, consider buying eggs from a local farmer and buying your vegetables from farmers markets.


*The cheese and butter were not purchased at the Dollar Store.

Disclaimer: The "Dollar Store" is the generic name I chose for stores where everything is a dollar.

Note: The date stamp is inaccurate.  

Mayonnaise

Since my youngest has to have lunch prepared for her and we were out of mayonnaise, I decided to make some. With the aid of the food processor and a recipe from Root Cellaring, the recipe is as follows:

Two eggs yolks (I doubled the recipe)

1/2 teaspoon dry mustard

1 tablesp00n honey

 1 tablespoon white vinegar (though other vinegars could be used to create a different taste)


1 tablespoon lemon juice

1 cup salad oil (I used grape seed oil--though canola oil and other oils will work as well)      


The result: a finished product to make a sandwich fit for any peanut-free facility:


Yum.


Tomato Sauce


Since a friend offered me half a pig which she had nurtured with goats' milk at a price I couldn't refuse, I found myself having to clean out the chest freezer to make room.

Much of what the freezer held were bags of frozen tomatoes: fruit of the 134+ tomato plants grown from seed the year before (it was an accident).


After researching how to handle frozen tomatoes (most sites recommended letting the tomatoes defrost by letting them sit, undisturbed, on the counter), I sought a recipe for a great-tasting tomato sauce, and settled on the recipe from Preserving Summer's Bounty which called for garlic (though not enough), carrots, onions, and more. The added bonus was the carrots and onions that went onto the sauce came from this year's garden.

The end result was a fragrant and delicious sauce for dinner that night.


Putting the defrosted tomatoes though the food mill


The sauce as it's cooking

There's more bags of frozen tomatoes waiting to be turned into sauce or something else delicious...

Cheese

There is something magical about cheese--all the better when you can make it yourself. This is an endeavor in which you will need to invest, as it will require more than what can be found easily one's kitchen. However the investment is more than worth the effort and expense.

My foray into cheese-making grew from my father's Christmas gift: a cheese-making class held by a woman who happens to be a poodle fan and a maker of incredible cheese, Barbra Skapa, of Echo Ridge Farm Organic Cows Milk Cheese. If you can take a cheese-making class, it allows you the opportunity to actually see how cheese is made, make cheese yourself, and ask questions of the cheese-maker--far more interactive than working from a book or an online site. Thanks to Skapa's influence, I began to collect the tools for cheese making. They are as follows:


BOOKS

If you are working with raw milk:
The Cheesemaker's Manual by Margaret Peters-Morris

If you are working with pasteurized milk:
200 Easy Homemade Cheese Recipes by Debra Amrein-Boyes

The distinction between the two milk types is very important, as raw cows' milk acts far differently than pasteurized milk during the cheesemaking process.

If using pasteurized milk, use ONLY whole milk.


CULTURES AND INGREDIENTS 
(by cheese)

Brie/Camembert: MA4001/4002*, Rennet**, Penicillium Cadidum Powder***

Cheddar (Farmhouse): MA4001/4002, Rennet

Fromage Blanc: (a soft, French cheese) MA4001/4002, Rennet, spices and herbs of your choice

Mozzarella (Cultured): MA4001/4002, Rennet, Lipase****, Citric Acid

Queso Blanco: (semi-soft white cheese) White Vinegar, spices and herbs

______
 *MA4001/4002: mesophilic starter

**Rennet (either vegetable- or calf-based): curdles the milk

*** Penicillium Cadidum Powder: produces the white mold found on Camembert, Brie and more

****Lipase: according to Merriam Webster, is "any enzyme (as one secreted by the pancreas) that catalyzes the breakdown of fats and lipoproteins usually into fatty acids and glycerol "


WHERE TO BUY CULTURES AND ENZYMES

The Dairy Connection This is my go-to source of most of my cultures and equipment. It was recommended by Barbara Skapa, and has proved, time and time again, to have excellent prices and excellent customer service.

The Cheesemaker A good source cultures, enzymes and moulds.

New England Cheesemaking Supply Another good source of cultures, enzymes and moulds.


EQUIPMENT 

Cheese Moulds
used to give cheese their shape

 Brie/Camembert

The mould pictured is 7 inches in diameter with 4.5 inch sides. These moulds come in various sizes. Note the open bottom. Large moulds available at the Dairy Connection and small moulds available at all three listed above.


CHEDDAR (FARMHOUSE)
The mould pictured is actually cut from a length of PVC pipe purchased at Lowes. It is 6 inches in diameter and has 8 inch sides (post-cut). It must be lined with a plastic bag before use.


FROMAGE BLANC AND QUESO BLANCO
The moulds are 4.5 inches in diameter with 3.5 inch sides. To allow free drainage of the cheese (whey is visible in the bottom of the pot), the moulds should be placed on a platform which also allows unfettered drainage--in this case, the basket from a salad spinner turned upside down. When working with pasteurized milk, the moulds MUST be lined with very fine cheese cloth or an equivalent fabric. The moulds are available at the Dairy Connection, The Cheesemaker and New England Cheesemaking Supply.

CLOTH

Any fine-woven natural cloth made from cotton or linen will do and can be found in many stores. Some examples are:

Cheese cloth: Defined by Webster as a "very lightweight unsized cotton gauze" which has been associated with cheesemaking since the 14th century. Only very fine cheese cloth will do. The stuff draped on trees at Halloween is far too loosely woven, and will allow the curds as well as the whey drain away. It can be found at many stores and health food stores and the cheese suppliers listed above.

Flour Sack Towels: This was a fine discovery I made at the Dollar Tree stores--for they cost only a dollar (unless you were to buy them by the case) and work very well for cheesemaking.

Linen or Cotton Handkerchiefs: These are available for less than a dollar at thrift stores. Their smaller size makes them perfect for lining moulds when making soft cheese using pasteurized milk. 


POTS

Pots from the cabinets will work. Ones that are of a heavier gauge work best as they will heat more slowly as well evenly. However, if your pots are of a thinner gauge, you can compensate by adding water to a large pot and putting a smaller pot inside it, essentially creating a double boiler. Six quarts hold a gallon, ten or more hold the necessary 2 or 3 gallons if you are making Brie, Camembert, or Cheddar.  Tall pots also make great places in which soft cheeses can drain.

 
SUNDRIES

Thermometer: This is must--the more accurate the better. A digital thermometer with a probe works very well as the base can be set on shelf at eye-level while the probe can hang into the pot. Note: these thermometers do not take well to being dunked in hot whey and refuse to work afterward.

 Salad Spinner: Another must--especially when making soft cheese that must drain. The basket inside the spinner makes a perfect platform on which to set the cheese moulds.

Turkey Baster: A must when making Camembert or Brie for these cheeses generate a lot of whey which must be constantly drained while settling into the mould. 

Cheese Mat: These are available at the above cheese suppliers and can be cut to whatever size you need. They are useful when draining Cheddar as well as Brie and Camembert. 


Storage Boxes: These are quite useful stand-ins for cheese caves. The thicker ply of the storage box is essential to create the mini-environment in which the cheese can ripen. They are also essential for keeping air-born particles from the cheese as it goes through its initial draining--especially when making Brie or Camembert. For draining, the box needs to be tall enough to accommodate the height of the mould as well as its width. 


Cheese Press: These are available at the above suppliers. However, it is possible to create your own press. I used this article for inspiration: Setting up a Homemade Cheese Press.